 .
.
This feature will allow you to select images by type to include with a document. The image types will be set at the document property level and all images of the selected types will be included with the export. The image will print after the document has been printed.
This is a Version 6 Feature. For information on obtaining this or any other features, please contact the Sales Department
To prepare your documents for the exporting feature it must be turned on at the Master document Level.
1. Go to .
2. Go to Master Documents.
3. Select your document.
4.
Click on  .
.
5.
Click on the  Tab.
Tab.
6. The Attachments window will pull up.

JST Hints: All documents will be set to the
default setting of “Do not Include images”.
7. To turn on the document attachments. Click the radio button for “Include all images of type”

JST Hints: Image Types are defined under
Defintions, Codes, Image, and Image Type. Please refer to the help file under
“IMAGE TYPE” for more details.
8.
Click on  .
.
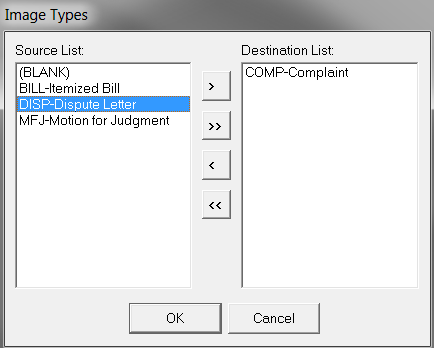
9. Then the selection window will open.

JST HINTS: The (BLANK) image type can be
used to find all images that do not have a type designated.
10. Highlight your selection and use the arrows in the middle to move them to the Destination List.
11.
After selecting your image types. Please click  .
.
12. Then
click  .
.
1. If you have selected "(BLANK)" as one of your Image types. The feature will only look for any blanks in the "Type" column on the far right.
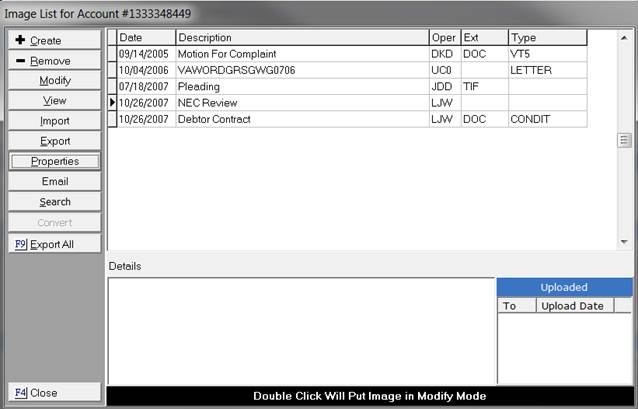
2. This export will not include compact documents. A compact document is any document that does not have an extension. In the example below two documents are not eligible for export. They are 10/04/2006 and 10/26/2007. On both documents the "EXT" is missing. So if you added any of the image types in your selection list. The documents will not produce. To make a document eligible for export it must have an extension which is visible in the "EXT"column.
3. The export feature can be used for manual letters, batch process letters, print now command, put on list command, preview command, print special command, quick edit command, group documents, and conditional documents.
4. If you are printing documents on demand or using the preview edit command. The exported image will not produce until after you leave Word or WordPerfect. This can be done by clicking on the JST END button. Once that is done your image will be created.
5. If you are using documents with an image type of .pdf. It will leave Adobe Acrobat running in the background. It will require you to close it manually.
6. The export feature only work on images that are printer friendly.
7. If you are on a workstation that does not have the proper software that produces the image. The image will not be exported. For example, if you want to export a .pdf image and you do not have Adobe Acrobat on that workstation your export will not produce. It will require you to go to a workstation that has Adobe Acrobat. It will only export images that would open on your regular workstation without having CollectMax involved.
This new feature will allow for you to print a document and export an image one debtor at a time. This is beneficial for documents that you are working on an individual basis or documents that are heavily edited.
To prepare image export for the "Print Now Command" found under documents. Align yourself to a debtor’s account.
1.
Then select  .
.
2. Then select the appropriate document.
3.
Then select  .
.
4. The document will print first and then the image will follow.
5. If the documented printed you will get the following message box.
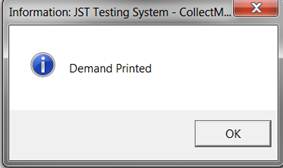
JST HINT: Remember if you are printing a .pdf document. It
will require you to manually close Adobe.
To prepare image export for the "Print Special command" Align yourself to a debtor’s account.
1.
Then select .
2. Then select the appropriate document.
3.
Then select  .
.
4. A box will be selected to pick your request.
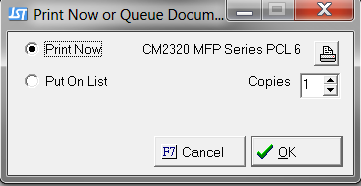
5. Select the appropriate radio button for the "Print Now" or “Put on List”.
6.
If you need
to change the printer select this icon  .
.
7. Then you will see a drop down for the appropriate printer selection.
8. Select the number of copies.
9.
Then click
the  button.
10. The document will print first and then the image will follow.
11. If the documented printed correctly you will get the following message box.
JST HINT: Remember if you are printing a .pdf document. It
will require you to manually close Adobe.
To prepare image export for the "Print Preview command". Align yourself to a debtor’s account.
1.
Then select .
2. Then select the appropriate document.
3.
Then select  .
.
4.
Then select  .
.
5. Make the proper modifications to your document.
6. In your Word-Processing Program select the Print button.
7. Your document should print as usual.
8.
Then in Word
select the  button
then
button
then  .
If you are using WordPerfect select your
.
If you are using WordPerfect select your  button.
9. Once the JST End button is selected it will trigger the attached image to print.
JST HINT: Depending on how many images you exporting you may
experience a brief delay after selecting JST End.
To prepare image export for the "Quick Edit command". Align yourself to a debtor’s account.
1.
Then select .
2. Then select the appropriate document.
3.
Then select  .
.
4. Make the proper modifications to your document.
5. In your Word-processing Program select the Print button.
6. Your document should print as usual.
7.
Then in Word
select the button
then .
If you are using WordPerfect select your button.
8. Once the JST End button is selected it will trigger the attached image to print.
JST HINT: Depending on how many images you exporting you may
experience a brief delay after selecting JST End.
This new feature will allow for you to batch a document and export an image to a print list. This is beneficial for documents that require little to no editing or if you want to print more than one letter at a later time.
To prepare for an image export from Batch Processes. Align yourself to the main menu.
1.
Then select  .
.
2. Select the drop down under “Process type”.
3. Select Letters Per Account, Letters Per Claim, and Letters Per Client.
4. Then select your criteria on the first screen.
5.
Then select
the  button.
6. Then select your Letter using the drop down provided.
7. Then select your Print List using the drop down.
8. If you want to “Add Letters to Images when printed” check the box.
9. If you check the box then you can add a Description, Type, and Details.
10.
Then select  .
.
11. This will return you to the main menu.
12.
Then select  .
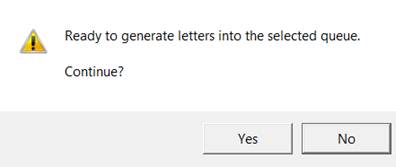
.
13. Then this prompt will appear.

14.
Select  .
.
15. Then you will then see a series of scans that shows that the process is working. It will then produce a preview report. This preview report is available for print. Once you cancel out of the preview report you will see this message.
16.
Then select  .
.
17. Then you will be prompted for your master password.

18. Then you will see a Final report showing that your letters were sent to the Print List.
19.
Select  .
Then you should be back at the main menu.
.
Then you should be back at the main menu.
20.
Select the  button.
21. Select the appropriate Print List.
22.
Then select
the  button.
23. At this point you should see a list of your documents.
24.
Click the  button.
25. The documents and the images will print in a collated fashion.
JST Reminders:
 button
from the print list screen.
button
from the print list screen. 
It will require you to print your documents from the details button because a document within this print list has an image attached to it. We do not have a way for you to tell which document has the image attached to it.
To prepare image export from the Debtor’s account. Align yourself to a debtor’s account.
1.
Then select .
2. Then select the appropriate document.
3.
Then select
one of the following to  ,
,
 ,
,
 ,
.
,
.
4. Then it will send your document to the print list. Follow this process for all documents that you would like to send to the print list.
5.
After you
finish sending documents to the print list. Then select  .
.
6. This should align you to the Main Menu.
7.
Select the button.
8. Select the appropriate Print List.
9.
Then select
the button.
10. At this point you should see a list of your documents.
11.
Click the button.
12. The documents and the images will print in a collated fashion.
JST Reminders:
JST HINT: If you get this message when hitting the
button
from the print list screen.
It will require you to print your documents from the detail button because a document within this print list has an image attached to it.
We do not have a way for you to tell which document has the image attached to
it.
All documents exported with images will create a history note with the details and a time stamp. Align yourself to a Debtor’s Account.
1.
Then select
the  tab.
tab.
2. Then Scroll to the bottom and you should see a history note similar to this.
